Wednesday, July 26, 2017

DT Teresa - Play To Your Strengths 2

Hello! I hope this mid-week day finds you well.

I have another interactive card to share today, a design feature determined as a strength of mine. Playing to our strengths is the theme for the Auzz Trinklets and Crafts blog this month.


This card uses Neenah Classic Crest 110lb Smooth Solar White Cardstock for the base which is cut with a paper trimmer at 4 1/4" x 11" and scored with a teflon bone folder at 5 1/2" to make a top folding card of 5 1/2" x 4 1/4".


I cut two pieces of Strathmore Bristol Smooth Paper at 5 1/2" x 4 1/4" and squirt some Ken Oliver Color Burst powders across the cardstock - Ultramarine Blue at the top, Pthalo Green in the middle and Violet along the bottom and squirted water over the powder using a Tim Holtz Distress Sprayer to spread the colour. I dried the piece off with a Wagner Heat Tool and die cut the pieces using the scalloped rectangle frame from My Favorite Things Blueprints 27 using a Sizzix Bigshot machine.

I took the My Favorite Things Slider Channel Builder and made a modified cut in the middle of one of the coloured cardstock pieces. I did this by using the largest die and running it through with the end of the die hanging outside of the plates so it would not cut through the cardstock. I then turned it around and repeated this on the other side, leaving a smaller rectangle with curved corners. This gave me my window. I reserved the positive rectangle for the card assembly. I stamped the sentiment 'have a magical day' from the Lawn Fawn Fairy Friends in Versamark ink with a Misti stamping tool and embossed it with Ranger Embossing Powder, White with my heat tool. 


From the second piece of coloured cardstock I cut a piece across the middle using the same die as above to give me the piece to slide in and out of the window. As it was similarly coloured, it does not look out of place on the finished card. I used an EK Tools Powder Tool to prep the surface of this piece, ensuring embossing powder would not stick to where it was not desired. I stamped the sentiment 'waving hello' from the stamp set Lawn Fawn Mermaid for You using the same instructions as above. 

I then stamped numerous images from the Lawn Fawn Mermaid for You stamp set, the copic coloured images in Memento Tuxedo Black ink onto X-Press It Blending Card and the solid images in Tim Holtz Distress Oxide inks and cut these out using the corresponding dies. To assemble the card, I cut three of each of the remaining dies in the My Favorite Things Slider Channel Builder set of dies and stacked each of these, adhering them together with Ranger Multi Medium Matte. I then adhered these around, above and below the window on the back of the coloured piece of Bristol cardstock. I adhered this to the card base and then adhered the reserved piece ('have a magical day') inside the window to the card base also. I slid the large coloured diecut piece in on the right hand side of the card. This slides in and out easily as the piece has plenty of clearance with the three layers of die cuts under the window piece. 


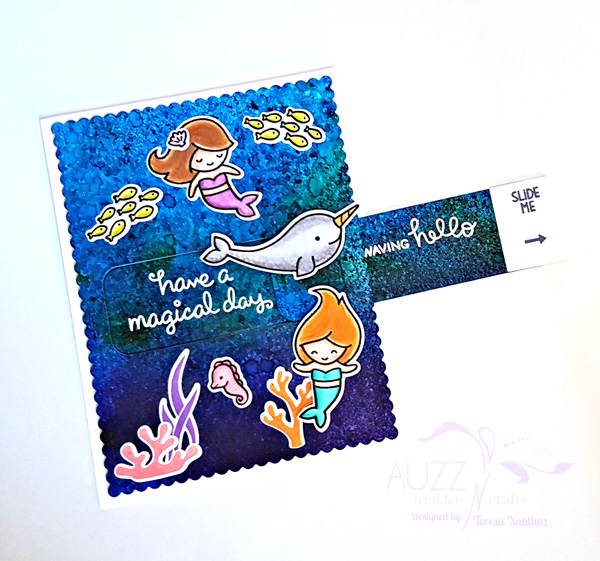
I then cut two shortened fish tail pieces from Neenah Classic Crest 80lb Smooth Solar White Cardstock with a die from My Favorite Things Jumbo Fishtail Banner Stax, the perfect width for the slider piece, so I adhered these as a handle and stamped the 'slide me' from Lawn Fawn Push Here stamp set in Tim Holtz Distress Oxide Ink.

I adhered all the images, some with Ranger Multi Medium Matte and others with 3M Scotch Double Sided Foam Tape. The narwhal in particular, was adhered with foam tape as this prevents the slider piece from escaping the card when opened. I finished by adding Zig Wink of Stella to parts of the images, unfortunately difficult to photograph.


Thankyou for following along with me today. If you cannot find the items I have used (listed below) in the Auzz Trinklets and Crafts store, be sure to drop Neha a message via email or Facebook and she will do what she can to order the product in for you.


Happy crafting and have a great day!


Teresa


Products Used:

Neenah Classic Crest 110lb Smooth Solar White Cardstock
Paper trimmer
Ken Oliver Color Burst powders - Ultramarine Blue, Pthalo Green, Violet
Tim Holtz Distress Sprayer
Wagner Heat Tool
My Favorite Things Blueprints 27
Sizzix Bigshot machine
My Favorite Things Slider Channel Builder 
Versamark ink
Misti stamping tool
Lawn Fawn Mermaid For You
Copic Markers - 0, BG11, BG13, BG15, E000, E00, E02, E35, E50, E53N0, N02, N04, R20, RV21, RV23, RV25, Y26, Y28, Y32, YG21, YG25, YR12, YR14, YR15, V01, V04, V06, V12 
X-Press It Blending Card
Tim Holtz Distress Oxide inks - Worn Lipstick, Wilted Violet, Spiced Marmalade, Faded Jeans 
Ranger Multi Medium Matte
Neenah Classic Crest 80lb Solar White Cardstock
My Favorite Things Jumbo Fishtail Banner Stax
Lawn Fawn Push Here
3M Scotch Double Sided Foam Tape
Zig Wink of Stella

Saturday, July 22, 2017

Dt Deni - Play To Your Strengths 2

Good Morning Everyone,


Another cool day here in Sydney at the moment, my poor little hands are not coping with the cold weather at the moment.. you'd think I was elderly the way I'm not coping haha.. but yep I'm in my thirties...

We are still playing to our strengths this month, of course mine is my Copic Markers, I love them to bits :-)

Today I have a card to share with you. I'm starting to get back into the hang of things here after a dry spell of creativeness. When I say starting to get back into it.. Ive made over 20 cards in the past two weeks which is fantastic. I have just been free crafting (meaning no writing down just products just enjoying the time) which has been awesome!


I created a card for a teacher.. I actually had in my mind to use a "teacher" word die for this card but of course I couldn't find it until i'd finished the card (but I did find the apple whilst searching).

I have used a few My Favorite Things products on this one.. MFT Red Delicious, MFT Straight To The Point Pure Innocence Stamp and I used the star from MFT Rock and Roll die set.. as I couldn't find any of my star dies either.. I have everything sorted in my craft room but a few things are just hiding from me at the moment.

I found a cute leaves patterned paper from Pebbles Party With Amy Locurto - Rainbow paper pad.. this is one of those paper pads i've had for a while.. I keep thinking it's one of those never ending pads but then I remembered i had purchased a few of them lol.


The Pure Innocence stamp I popped into my Misti Stamping Tool and stamped it onto some Mondi Color Copy 250GSM paper using Memento Tuxedo Black. I then cut her out using the matching die on my Sizzix Big Shot.


I coloured her up using Copic Markers. I used E11, E13, E15 for her skin, E71, E71, E74 for her hair. For the shoes and pencil I used C8 and C6 and R24, R29, R89 for the red parts. On the dress and her hair clip I used G40, G43 (I used one more darker marker but I'm unsure of what it was as I must have put it away). On the little book i just used N2, 0.
The Apple was cut using scraps from my leftovers bin, they are more than likely all American Crafts Cardstocks. The banner was cut using MFT Stitched Banners and I stamped a sentiment from the Pure Innocence Straight To The Point Set using Memento Tuxedo Black.
All my plain Cardstock is American Crafts cardstock which are all cut on my Cutterpillar Pro. The cardbase is a pre-made one from Twiddleybitz (I purchased these in bulk many years ago).


At the time of this blog post, this card is still for sale although not listed on my Facebook Page as I am about to do a big overhaul on my page with new pictures etc. (I'm waiting on my new Photobox to arrive). If you are interested feel free to send me a pm on my page. www.facebook.com/angelhandmadepapercraft

Products Used On This Card

Memento - Tuxedo Black
Mondi Color Copy 250gsm
Pebbles - Party with Amy Locurto - Rainbow
My Favorite Things - Straight To The Point & Matching Dies
My Favorite Things - Rock and Roll
My Favorite Things - Red Delicious
My Favorite Things - Stitched Fishtail Flags Stax
Twiddleybitz Cardbase
American Crafts Cardstock
Copic Markers
Cutterpillar Pro
Scotch ATG
Tombow Mono Multi Liquid Adhesive

These products are available to purchase over at the Auzz Trinklets n Crafts Shop.

Copic Markers Used 

E11, E13, E15
E71, E71, E74
C8, C6
R24, R29, R89
G40, G43 (I used one more darker marker but I'm unsure of what it was as I must have put it away). N2, 0.


Thanks For stopping by,

I hope you have enjoyed seeing my card today and don't forget to stop by and check out more posts from the other Design Team Girls.

DT Deni


Friday, July 21, 2017

DT Kerry - Play to your strengths 2

Hi Crafty Friends,


As we continue the month with the theme "Play to your strengths" I got a little carried away and thought I would create a few cards for you using another of my "strengths" - which are die-cuts.  There are so many lovely stamps and co-ordinating dies coming on to the market lately - I want them all!  They make it so easy to create beautiful eye-catching designs.  The ones I have used here today are from Concord & 9th.

Another new product I couldn't wait to get my hands on are the Distress Oxide inks from Tim Holtz.  I have to say I'm a bit of a fan - they blend so well.  Will definitely have to invest in ALL the colours.


Check them out in Neha's shop!


I embossed the inside for some additional detail.


I used my Copics to colour the back of the vellum to give it some dimension.


Products used:
Concord & 9th "Detailed Blooms" Dies
Concord & 9th "Many Mandalas" Stamp Set and Dies
Tim Holtz Distress Oxide Inks in Broken China, Cracked Pistachio, Worn Lipstick
Ranger Mini Ink Blending Tool
Altenew Mini Ink Cubes in Seashore
Ranger Emboss powders in Silver & White


Copic Markers used RV23, RV55

Saturday, July 15, 2017

DT Cassie Play To Your Strengths

Hi Everyone!

It's Cassie here and I am so excited to be part of this creative team and sharing some of my creations with you! We are playing with our strengths this month and I love nothing more than doing a bit of watercolouring. I own a range of watercolour mediums but today, I have been using my Tim Holtz Mini Distress ink cubes.

I started by cutting my XL Canson watercolour paper to size (9.5cms x 14cms) and prepared my Tim Holtz inks on a sheet of acetate paper. I sprayed a thin layer of water on the inks to get them moving. Very carefully, I picked up my acetate and placed it ontop of my watercolour paper and smoothing out the inks so they mixed a little.

Then, I picked up the acetate and pounched the acetate sheet to where I felt needed more colours. Once I was happy with the results, I let it dry. You can also dry it with your heat tool if you want to speed up the process a little!

Once it was all dry, I took out my Simon Says Stamp Elizabeth background stamp and positioned it on my MISTI stamp positioner (take out the black foam piece). I used my antistatic powder tool to prep my watercolour card to avoid any static and using my Versamark ink, I inked up the stamp and then embossed it with Ranger Black Sparkle embossing powder.

I stamped the Happy Birthday onto a scrap piece of black card and emobssed it using WOW white embossing powder. The sentiment is from Gerda Steiner "All Cats" stamp set.

I trimmed the sentiment out and mounted it onto foam tape and finally, I matted it onto black cardstock before adhering the card front onto a side folding card base to finish it off!

I love how watercolours are so unpredictable but always gives such an amzing effect and always one of a kind! I repeated this process with a range of different colour combinations.

Happy crafting my friends! 


Wednesday, July 12, 2017

DT Teresa - Play To Your Strengths

Hello!

This month on the blog we are each 'playing to our strengths'. I have chosen to feature interactive card designs; they are so much fun to create and receive!

This card uses Neenah Classic Crest 110lb Smooth Solar White Cardstock for the base which is cut with a paper trimmer at 4 1/4" x 11" and scored with a teflon bone folder at 5 1/2" to make a top folding card of 5 1/2" x 4 1/4".


I die cut numerous copies of the claw machine with Lawn Fawn You're Claw-some Lawn Cuts from Neenah Classic Crest 80lb Smooth Solar White Cardstock, 15-16 in all, with a Sizzix Bigshot Machine. I took a negative from one of the diecut pieces and used it as a template to line up in the bottom left corner of my MISTI stamping tool. I then took one of the claw machine diecuts, inserted it into the template, lined up the claw machine stamp from Lawn Fawn You're Claw-some and closed the door of the MISTI, picking up the stamp. I stamped the image using Memento Tuxedo Black Ink, removed the die cut and replaced it with the next blank diecut. I repeated this until all the die cuts were stamped.


I coloured the inside of the claw machine, the teddies and around them with Copic markers, this being the base layer. I then took 10 or so of these diecuts, cut the inside of the claw machine away, using a Tim Holtz Idea-Ology Design Ruler and a craft knife. I coloured only one of these pieces for the top layer of the claw machine. I used a die from Lawn Fawn, Slide on Over to cut a space for the My Favorite Things Slider Element to sit, into every one of the claw machine die cuts - apart from the base and top pieces. I stamped the hearts from Lawn Fawn, You're Claw-some along the top section of the machine on the top layer die cut.


I proceeded to adhere these pieces together with Ranger Multi Medium Matte, lining them up carefully. The sides of the diecut are so slim, but as I built the layers, the shape gained integrity and was not so delicate. The remaining stamped dies were cut to allow the claw to slide along the top of the machine, attached to the Slider Element by a small piece of cardstock, the mechanism hidden by the top layer. I adhered these and placed the hook with Slider Element into place. I considered placing some shaker items into the space, but realised this would compromise the slider from running smoothly as they would get in the way, so decided against this. I then adhered a sheet of acetate to cover the area so it would resemble a glassed in claw machine and adhered the top layer to the machine.


To assemble the card, I diecut two rectangles with a die from My Favorite Things Blueprints 21 from Neenah Classic Crest 80lb Smooth Solar White Cardstock and one from a sheet of designer paper from Lawn Fawn, Perfectly Plaid, Fall 6x6".  I placed one of the Neenah rectangles and the plaid rectangle piece one on top of the other and cut them diagonally with my paper trimmer. I then adhered matching pieces of the rectangle onto the second Neenah rectangle, coloured the top Neenah piece with a copic marker and I stamped the sentiment from Lawn Fawn, You're Claw-some onto this piece before adhering it directly onto the card base. I placed the claw machine onto the card, added Tonic Studios Nuvo Crystal Drops - Glitter, Blue Lagoon onto the stamped hearts and Ranger Glossy Accents onto the joy stick controls and around the drop zone of the machine.


Thankyou for following along with me today. If you cannot find the items I have used (listed below) in the Auzz Trinklets and Crafts store, be sure to drop Neha a message via email or Facebook and she will do what she can to order the product in for you.


Happy crafting and have a great day!


Teresa


Products Used:

Neenah Classic Crest 110lb Smooth Solar White Cardstock
Paper trimmer
Lawn Fawn You're Claw-some Lawn Cuts
Sizzix Bigshot Machine
MISTI stamping tool
Lawn Fawn You're Claw-some
Copic markers - B0000, B00, B02, BG10, BG11, 
C1, C3, C5, C7, E11, E13, E15, RV000, RV02, RV10, Y00 
Tim Holtz Idea-Ology Design Ruler
Craft Knife
Lawn Fawn, Slide on Over
Acetate
Lawn Fawn, Perfectly Plaid, Fall 6x6"
Tonic Studios Nuvo Crystal Drops GlitterBlue Lagoon


Friday, July 7, 2017

DT Kerry - Play to your strengths

Hi everyone, my name is Kerry and I'm very excited and feel privileged to be on the Auzz Trinklets Design Team. I hope you find some inspiration from my work.
I was asked to "play to my strengths" in this theme so after much contemplation, I decided to go with stamping. It's something that I do in almost all of my projects, whether that be a card, scrapbook page or pocket page. I love stamps and love to use them. One of my most favourite companies to ink up at the moment is Lawn Fawn, and recently they have come out with so many adorable ones. They make it so easy to create a whimsical and fun project.

I cut some Bristol Smooth Cardstock with Lawn Fawn's Stitched Rectangle Die and blended Distress inks to create the space background. I then splattered some white Zig Kuretake Gansai Tambi watercolour splashes and drew on some stars and dots with a white gel pen to give that Galaxy effect.
After using my Misti to stamp out my images I coloured them with Copics. I coloured in the spaceman's helmet with Wink of Stellar glitter pen and covered it in Ranger Glossy Accents and put aside to dry. Using Lawn Fawns Fancy Box die I cut the box out of black cardstock and adhered some acetate for the window.  I just love how these cute little boxes are just perfect for a gift card or a few lollies.  I'm going to put some silver star sequins in for a bit of added surprise!

I just love all these new innovational dies that assist you in putting together a little creation with ease.


Another new super fun die is the Lawn Fawn Scalloped Box die. I haven't had this die long, but I can tell I'm going to use it a heap!
I cut pieces of Lawn Fawn Watercolour Wishes and pastel Perfectly Plaid cardstock. I then cut out some grass and flowers from the Lawn Fawn Grassy Border and Lawn Fawn Flower Border dies and colour blended them using Mowed Lawn and Twisted Citron Distress inks and Copics. Once assembling the box I moved onto the other elements.


I created a clothesline full of baby clothes with the Lawn Fawn Little Bundle stamp set and added a fairy and flower from the Lawn Fawn Fairy Friends stamp set plus a snail from Lawn Fawn Gleeful Gardens.


I propped up the fairy to make her look like she is floating with some clear acetate, embossed the greeting with some Embossing Powder and adhered all the little pieces in to finalise my card.  A couple of little clothes pegs adds a little extra cuteness but these can be left off if you are mailing the card. 


Enjoy your weekend and happy crafting!

Sunday, July 2, 2017

DT Deni - Play It To Your Strengths

Good Morning Everyone and welcome to July and Term 2 of our Design Team.

This month to break in the Design Team I thought i'd give the girls a chance to "Play to Your Strengths". So this is what we went with for our theme this month.

I decided my strengths were my Copics so I made a card using both my strengths and my weaknesses. I have never been much for using Distress Inks so I used those also.

I was finally able to get my hands on the "Mermazing" stamp and die sets from My Favorite Things in my last package from Auzz Trinklets N Crafts. I stamped the images using Memento Tuxedo Black in my Misti Stamping Tool, I coloured the gorgeous mermaid and the sea shell up using my Copic Markers and die cut them using the matching dies on my Sizzix Big Shot.


I decided to use the "Sending You Oceans Of Love" sentiment, so I grabbed some scraps of Canson Black cardstock that were sitting on my desk (which I prepped using an embossing buddy) and stamped it using Versamark Watermark Ink Pad and a Lawn Fawn Acrylic Block. I covered it in Wow Opaque Bright White (Superfine) Embossing Powder, Popped the excess back into the jar using some paper scrap that was on my desk. I then heated the Embossing Powder up using my Heat Tool and trimmed it to size using Tim Holtz 8.5" Trimmer from Tonic Studios. I cut the Flag end using my Cutterbee Scissors, I just cut a slip in the centre and met the corners to the middle creating the flag.

I hadn't really planned this card out like I normally would so at this stage I had no idea what I was doing haha.


I decided a blended background would be nice so I pulled out my Ranger Tim Holtz Embossing Inks and my Mini Ink Blending Tool. I used Tumbled Glass, Salty Ocean and Faded Jeans to blend on some Mondi Color Copy. I added some splashes of water using Ranger Mini Mister, which I lightly dabbed back off using paper towel.

I then cut a circle out of the blended piece using Stitched Circle Dies from Lawn Fawn. I attached the images and the sentiment to the circle using Tombow Mono Multi Liquid Adhesive and Scotch ATG.

Next was time to find some matching paper.. which I actually didn't end up doing.. I decided to make some to match.


I pulled out my Mermazing stamp set and My Favorite Things Hybrid Inks and started stamping onto Mondi Color Copy and creating a background paper. I used Sour Apple and Gumdrop Green. The paper still looked like it was missing something so I used the Avery Elle That Bites stamp set and grabbed the little bubbles image and added some of those in Black Licorice Hybrid Ink.

I cut a black square using Canson Cardstock and Lawn Fawn Stitched Squares dies on my Sizzix Big Shot, I then added the patterned paper using Scotch ATG and then added the circle (with images and sentiment attached) using Tombow Mono Multi Liquid Adhesive. I used some Mod Podge Dimensional Magic on the shell in her hair and the extra shell. I added Wink Of Stella Clear Glitter Brush to the Mermaid and added some sequins to the water.

Once all the layers were complete I added them to a pre-made Twiddleybitz card base using Scotch ATG. On the inside of the card I used another black stitched square from Canson cardstock. I added a strip of the leftover blended cardstock to the bottom, used left over images from my die cuts, stamped some of the plant images to the corner. I then stamped the sentiment to bottom to finish it off.


Products Used On This Card

My Favorite Things - Mermazing Stamps And Dies
Ranger Tim Holtz Distress Inks - Tumbled Glass, Salty Ocean, Faded Jeans
Ranger Mini Distress Blending Tool
My Favorite Things Hybrid Inks - Sour Apple, Gumdrop Green, Black Licorice
Memento - Tuxedo Black
Avery Elle - That Bites
Wow Embossing Powder - Opaque Bright White (superfine)
Ranger - Multi Medium Matte
Sequins- Stash
Mod Podge - Dimensional Magic
Universal Crafts - Ultrafine Tip Glue Applicator
Wink Of Stella - Clear Glitter Brush
Tim Holtz Tonic Studios - 8.5" Trimmer
Sizzix Big Shot
Lawn Fawn - Stitched Circles Dies
Ranger - Mini Mister
American Crafts - Cardstock
Mondi Color Copy 250gsm
Embossing Buddy
Tombow Mono Multi Liquid Adhesive
Cutterbee Scissors
Twiddleybitz Card Base
Pick Me Up Tool
Uniball Signo Angelic White

Copic Markers Used

E000, E00, E21, E11, E04, R20
E21, E23
Y11, Y13
R81, R83, R85

Thanks For Stopping By,

DT Deni
 photo oldswirl_zps9e8ffa8f.png